Saturday, November 27, 2010

The end of the year!


The end of the year is upon us! And I have quite a bit of calendars left to sell! I would love your help!

If you are interested in getting a 2011 La Jolla calendar from me, I can have it sent to you long before Christmas! The cost is $20, and I am asking for an additional $5 for shipping and handling. And if you are local, the San Diego area, I am SO willing to deliver in person, just tell me which Starbucks to meet at! :)

I went on a line, and ordered a LOT of them, and now that I am out of work for a few weeks, I no longer have resources to sell as if I were at work, dealing with lots of people.

They make great Christmas gifts and as a matter of fact, there is a total of 13 months in this calendar, it starts December of this year! What a bargain! Above is 12 of the 14 images used for the calendar!

To order one, please drop me an email:

Cuteasabugonarug@gmail.com

I take PayPal and cash, if in person of course.

I hope every one has a wonderful and safe Christmas season!

Wednesday, November 10, 2010

2011 Calendars are IN!


I am happy and excited to announce that my La Jolla, 2011 calendars, are in! I have MANY and I want to sell them all! There is a part of me that feels as if I have ordered too many! And another part of me that tells me, "I can and I WILL sell them ALL!" I know, its always best to listen to the "glass is half full" side of me, but I cannot help but wonder, will I be stuck with innovatory at the end of the year?

Enough self doubt! Of course I will do fine. After all, the subject is La Jolla, and who does not LOVE La Jolla! And if you have never been there, you gotta go! One of the most beautiful places I have ever been too, bar none!

Here is how you order. I am now a proud owner of a PayPal account. And, its the first time I have done anything like this. If I am correct, all I have to do is give you my email address, and that can get you "in" with payment on PayPal? Any one out there who does this often, please correct me if I am wrong. Like I said above, this IS my first shot at this. And at the end of the end of the year, I hope to have dreams of doing this for 2012! With your help of course!

And NOW is the time to buy! I will be having a procedure done on my right shoulder, and will be out of the game for at least a week, so if you wish to not have a delay, email me right away!

Any further questions, please feel free to email me at:

Cuteasabugonarug@gmail.com

This is, by the way, the email address that is connected with PayPal.

Thank you all for your support and I hope I can provide for you a beautiful calendar for 2011!

Monday, November 8, 2010

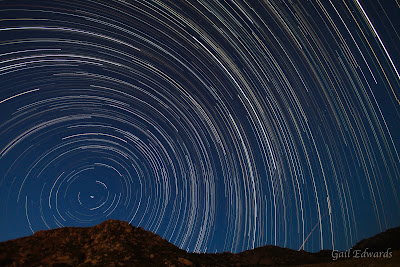
Why do the stars curve like that?


So often, I get questions. Questions of how I do this or why does that happen. I love it when people ask questions like that, and I love it even more when I know how to answer! And once in a while, I know the answer, but there are others who can answer it all better then I can.

For this question, about this image, I can answer, my my all knowing about stars sister, Karen, well she can answer so much better! Fact being, she was the one to originally told me the whole left to right, north to south answer to began with. So, here we go. Why do the stars curve to the left AND to the right?


"What are star trails and why do they look like that?

As the Earth spins around on its axis, the background of stars appears to move from East to West. Over the course of one day, the background of stars will have aparently moved 360ยบ, a full circle. Stars closer to the North and South Poles do not move as rapidly as those closer to the Equator.
Timed photographic exposures or stacked exposures can be done in one of two ways: tracked counteracting the movement of the Earth (no star trails) or the camera kept still, moving with the Earth (star trails). In exposures that show star trails, the stars closer to the poles make a tighter circle around each of the poles. These stars are called "circumpolar" and most latitudes have circumpolar stars or constellations. They are visible through the night and the year. A couple of examples of this for the Northern Hemisphere are the Big Dipper and Cassiopeia.
Therefore, stars in the Northern Hemisphere arc toward the North Celestial Pole (Polaris) and stars in the Southern Hemisphere arc toward the South Celestial Pole (which doesn't have a pole star). Stars closer to the Celestial Equator do not arc either way, but appear to move in a straight line.

Karen I. Meddows-Carey
Harford County Astrnomical Society
Harford County College, BelAir, Maryland
One People - One Planet - One Sky"

The basic translation of this is: The stars that curve to the top left of the image, are over the Northern Hemisphere, the stars that curve to the bottom right, are the stars over the Southern Hemisphere and the stars that are straight, they are over the Equator. The whole thing is pretty cool, if you ask me. The way Earth turns and how we all stay on!


Tuesday, October 19, 2010

Putting together the calendar!


For 2011, I am putting together a calendar! Yes, I have mentioned it before, but now, I am starting to see it come together. Today, I got some images, in print, so I can see which will and will not work. Because printing something, is FAR different then just viewing it on your nice and bright computer screen. So, that all being said, this has been A HUGE challenge. And I really have not even gotten started.

Now, I am finally ready to assemble the calendar together. I have chosen at least 10 out of 13 images. And I have set the price point. I am thinking that putting them together and sending in the order to have them printed. I have even located a high quality printing company that only deals with calendars. I am getting excited! All I really need to do is find the buyers! So, I guess to sell outside of my home town, I need to set up PayPal account and let the show really get started!

Now, if this is something you would be interested in, feel free to contact me at Cuteasabugonarug@gmail.com and I will be more then happy to get the details out to you! I am excited to see the final project and I am excited to print a lot and sell ALL that I print, wish me luck! :)

Here is one of the images I have chosen and I hope you like it! Please enjoy!

Tuesday, September 28, 2010

I always want to do better


Through out my first year of photography, I have learned many things. And the one of the most important things I have learned, I want to do better and I know I can do better. Actually, when I first started to shoot, I thought I did OK and I had no idea that getting better was an option, but life goes on. At that point, it was all about passion. And drive I guess. Now that I am wrapping up the first year, I realize that I did get better! And, I still want to do even better. How do I get there?

Practice and gear! Practice, yes, I shoot every day. I might not post what I shoot, because I would rather post quality rather then crap, and not everything is great! And gear, there are some new filters that I want that I KNOW will make a difference with my sunset shots, I KNOW IT! I would not be able to shoot into the sun without the filters I own. I know they make a difference. And the new filter that I am getting, will help with the sunsets and NOT add the color cast that I so often get. And when I get the new filters, I will keep the old ones, because the color cast does work out for me at times. Right time and right place for everything! Right?

For this image, I did use an ND filter, the B+W ND 106, which is a 6 stop filter. As well has my Cokin hard grad filter. This does seem to be my most favorite combo of filters right now. It gives great blockage of light as well as toning down the intense light of the horizon. And then of course, the time and fun spent in LightRoom3. My new favorite tool to get the job done! I KNOW I have to sept it up when it comes to post processing. I have this calendar hovering over me for 2011 and I need to make sure it looks pro! LR3 can make it happen for me!

For now, I hope you enjoy this image and all of my images for that matter! And feel free to take a look at my photos listed on Flickr! Please enjoy!

Wednesday, September 22, 2010

Time, time, time....


....thats all I have is time on my hands! I have spent 35.75 years of my life working hard and now that life is slowing down, it feels good! I need the rest, physically and mentally! And now that time, I am feeling so much better! :) And I can spend more time with what I love to do, photography. Now, due to location, I cannot spend all day at La Jolla! Man, that would be too good! But when I have running around to do, I make sure to have some beach time when out!

But I would like to share what I have been doing, because thats what I love to do the most. Shooting long exposures! And I am not sure I really have any lessons on this one like usual! I would be posting more if I had more ideas, but I don't. So, for now, I will just "promote" myself. Which is the reason why I started a blog. So, lets talk about my up coming project.

I am working on a calendar. I did this last year, I sold 10 calendars at $25 a piece, and the biggest surprise of all, is that was my cost, including shipping cost. This year, knowing that I actually want to go pro, I actually want to sell more and hopefully make a bit of a profit! The profit would go towards more gear of course, lol! Not looking for much, just enough to show I can do this, now that I have more time on my hands, I need to get moving on this! PRO BABY! Hahaha!

Of course, at this point, input is helpful! Any image you have seen that might look good for my task, feel free to say something. I have 40+ images that I am thinking about using, I need to weed that down to 13. (I need one for the cover too!) And, I also need a supplier to make the calendar. I do not want Mpic, even though I use them for printing, I am not happy with there prices and other details. I did find a supplier a while ago, but forgot what site it was! So, any suggestions there, please let me know! :) Until then, please enjoy!

Thursday, September 9, 2010

Geek talk:


One thing that I have been doing lately on my Flickr post, is adding my "geek talk." What exactly is "geek talk?" Oh, I bet you already know the answer to that, quite rhetorical! The thing is, I have noticed a lot of folks thanking me for the geek talk! People actually telling me "thank you" for adding the information on how I captured what I captured. Thats pretty cool! Cool enough to make a blog entry? Not sure, but here it goes! :)

The thing is, my sister on her FaceBook asked when she was going to get a moment to stop and breath. I let her know a few more years, it took me 35.75 years to get there! And eventually she will too! But her question was rhetorical too and I bet she did not want that from me! And why do I say 35.75 years? Because its almost my birthday! So, I am more then 35.5 years old! And, I have realized that now, and only now, have I had a chance to stop and breath! To relax a bit and slow down and realize there is a life outside of frantic fury! And why does this apply to my blog? Because I have actually HAD the time to blog! But I have no topics in my mind to blog, which is why when I thought of "geek talk" I was ALL over it! Because I want to blog, I really do! I now have time! So, I want to do something with my time! I would shoot more, but I would rather shoot at the beach, and I really live no where near the beach! I have to settle for mountains instead of flowing water, moving in and out with the tide! Not my pace. I did shoot today, where I live, and I am not going to post any of them! LOL, because I just did not like them! It is what it is!

So, back on topic, "geek talk!" Almost all the time, I now add on my shots, my geek talk, which is, as I said above, the information on how I got the image I got, people dig this! So, I keep it going. Is it repetitive? Ya, and I use to worry that folks would get tired of me using the same words over and over again! But what I think and what others thing are two different things! Yes, people do tell me, thank you for adding the geek talk! So, thats why! Boy, this is starting to sound like the first paragraph! My writing skills might not be the best tonight! :)

So, an image, with the geek talk!

For this image, I used the Tiffen ND8 (3 stop filter) and held over that, I used the Cokin hard grad filter! I had the tripod hanging over the separation of rocks. One leg on the right and two legs on the left. I had to manually hold the hard grad filter over the lens, because the adaptor ring for the holder is "stuck" on the 6 stop filter and I cannot get it off! And, at first, when I started shooting this, I thought I did put on the 6 stop filter, but was mistaken and only put on the 3 stop. In the end, I am glad I did, because the sky was getting too dark for the darker filter! And, when I got home, I processed this one using LightRoom3. And that would be the extent of my geek talk! OH ya, f/8 for 30 seconds on ISO 100. But I don't type that information out on Flickr, that is reachable on my exif data! :)

Please enjoy!

Tuesday, August 31, 2010

For the fun of it


I wanted to post something here, for the fun of it! I noticed that I spent very little time in August 'blogging" and it is my husband that HIGHLY recommends I keep up a schedule with blogging. He suggest that if I do not post something "regularly" then I have a chance of people not wanting to check me out! I really do think that this blog is my next step to moving forward with my photography, so no neglecting! And because I like to "teach" something, I am posting something with a new technique I have learned!

The photo above, I used LightRoom3 for the post processing. A gift from my husband, I had been using LR2 for a while now and realize how much I LOVE LR3 vs 2! Its a big difference! Any way, the one new feature that I really do like, which is available in LR2 and LR3, is the graduate filter! All of you have seen, if you visit my flickr account, what I can do with a hard grad filter, which I use all the time with my sunset images. The in LR filter does the same thing, but with an image that is already taken! Now, don't worry, I still believe in getting things "right" in camera! I am not much for post processing. But there are times when I can "save" an image due to the abilities of post processing.

For the image above, I did use, on the lens, a hard grad filter, made by Cokin. Its a nice filter and what I love about it is that it sure can add some colors to a nice, sometimes colorless, sunset. The sunset above, was not colorless! But I guess this phase was. Usually color is not a part of a sunset until after the sun has set! So before the sunsets, I still like to capture images, knowing they may or may not be usable! And once in a while, I actually take an image OF the sun! And this is one such as that. As you can see! SO after I put the image on the computer, I realized, I can use the LR3 grad filter on it! So, for this image, I set up the grad filter, from right to left, instead of top to bottom! At the end of the day, I was able to make the sun a little less bright, and lower the exposure ONLY on the side of the sun! I have another image that I did the same thing to, and it turned out good, but I want to re do the image, I KNOW I can do better! But for now, I hope you enjoy this image. In camera, I used the B+W ND106 as well as the Cokin hard grad filter.

Please, enjoy!

Saturday, August 28, 2010

A Beautiful La Jolla Sunset!


I am not really sure I have any information to share right now. I just want to share this photo! I know there is no use having a blog if you don't blog often. And so I knew I had to add something SOON! I did go on vacation last week, and that was all quite nice! But it put me into a place in life where I found myself too busy to do anything dealing with photography! I took photos, but I did not spend any time on the computer with post processing or any extra time on Flickr. Only enough time to post and run! Which I hate to do!

Any way, on this particular evening at La Jolla, I managed to capture a sunset that was one of the top 5 sunsets I have ever seen! It was amazing and stunning! Full of color and details! The water and the rocks at La Jolla Cove only added to the beauty that God had put before me. Its funny, because I was going to go to La Jolla the day before to catch the sunset. But I could not leave my house until 7:00, and my son and I still had to get dinner! That put us at heading down the hill exactly at sunset! And, after looking west, I realized that there was not that much color in the sky any way.

And then, the next day. There were clouds all around, from the intense heat. I knew that meant a special sunset! So, I took my son down the hill and we enjoyed the sunset, just a day late! As I was shooting, a surfer came up to me and said, "Is that the most beautiful sunset you have ever seen?" It was close, but not the most beautiful, But as you can see above, I was quite lucky to be where I was and at the end of the day, I am glad my son and I wend down the hill to catch this very beautiful sunset! And now, I hope you enjoy my sunset!

For this image, I did use the B+W ND106 filter, 6 stops. And I also used the Cokin hard grad filter. Please enjoy! And tell me what you think! Or if you have any comments! Or become a fan! Anything! :)

Tuesday, August 3, 2010

Our recent sunsets!


For those of you who live in San Diego, you know that our sunsets of late have been beautiful! Simply beautiful. And no matter if you are up in the hills or down at the water, every where you go there has been color and amazingly beautiful details. Last night, I had the joy and honor of capturing such a sunset at La Jolla Cove.

Now, I have to say, this has been a gripe of mine, head off to the beach and get NO clouds or overcast with too many clouds. Now, I don't mean to sound like I am complaining! But the truth is, the most beautiful sunset, sense going out and taking photos of them, was January 1st, of 2010. That sunset, well, it set the bar! And, over the past eight months, I have seen some beautiful sunsets, but none worthy of a standing O! Until last night. Now, I am sure there have been some outstanding sunsets over the past 8 months, I just have not seen them due to my rugged outdoors, up the hill, location. When I say capturing the sunset, I mean at my favorite location, the beach!

Now, a sunset like last night reminds me why I do what I do. Drive to the beach, an hour one way, and get there just in time to be disappointed. For weeks, upon weeks, I make it to the beach, and especially during the summer, I have no color at all when the sky is as grey as it has been. I keep thinking to myself, why! Why do I do this? And last night gave me the answer. It was a reminder, that I do what I do for the off chance that the sunset is a killer one like last night. The color was outstanding and the movement in the water was just enough to make it work. I say just enough because the surf as of late has been rather small. No biggie, as long as its moving, I can make something of it! And hey, if the water is not moving, the I get some other opportunities, like shooting the clouds reflections in the water. It really is rare to have that chance. Having low tide AND a very colorful sunset like last night. Any way, moving on.

I hope you enjoy this image, it was from last night and it was full of color and fire. And for this image, I used the B+W ND106, 6 stop filter, along with the Cokin hard grad filter. Which did add a bit of pink to the image, but there was already so much color in the sky, it really did not alter the image so much. I did need it though because the sky was bright enough to where with out it, the sky would have been very much over exposed.

Saturday, July 31, 2010

No longer one filter at a time, EXTREME stacking


Ya, I said it, EXTREME stacking! Thats what I call it when I take my two largest stoppers and put them together. Thats right, the B+W ND110 AND the B+W ND106. That is a total blockage of 16 stops of light! I have tried it twice now and one time worked out for me. However, I believe I know where I went wrong the second time, so I know what to try next time.

So, why in the world would I want to take away that much light? For starters, so that I can learn even more! Crazy, I know. But I have spent the past 7 months learning and repeating the act of long exposures. I know my filters like the back of my hands. I know how to allow light and take away light. I know how to capture the stars. The entire reason why I even committed to a 365 project was to set a goal for me, so that I can learn something. I wanted to master long exposures, so my topic is LONG exposures! If I do a project in 2011, it will be a topic that I want to master, for example, shooting 100% of the time in manual mode. So any way, back to my point. 7 months later, I realized that I know what I am doing. I get to the beach, I put my filters on and I pretty much know what I want my aperture to be for what filter for what time. I don't want to sound like I know everything, because I don't, but its not really a challenge for me any more! Its just another day shooting. So, a few days ago, while out, I thought about taking the longer exposure to the next level. To have SO much stops of light blocked, that it would require minutes instead of seconds. I was inspired by one of my flickr contacts. So, thats what I did. I put on my two DARK filters and this is what I came up with.

The image here, is a total of 300 seconds long. That is a grand total of 5 minutes long! In the middle of the day at an f/8 aperture. Oh, and of course, because its me, I used ISO 100. When I took the image home and processed it, converting it to black and white, I knew I had to play around with more of these. I love the effect and I have to say, when I took the image, I KNEW it would be the most perfect black and white. And let me tell you, I am not huge on black and white, but I am for this type of work.

I hope you enjoy and I also hope you take the time to view my other images on my 365 day project on Flickr, they are all long exposures and pretty much, in a package, my style of photography.

Friday, July 23, 2010

No longer one filter at a time, stacking the ND!


So, I spent quite a bit of time talking about each filter, one at a time. But that is not all to life! I have two combos that I like to use, because sometimes I am up for a touch more then what one filter has to offer. The two combos I use are:

B+W ND106 + Tiffen ND8 = A total of 9 stops of light

B+W ND110 + Tiffen ND8 = A total of 13 stops of light.

So, why would I want to go through the trouble of stacking two filters to get 9 stops instead of using my 10 stop? Because some times, I do not want to spend time in the post processing phase for the color correction that I often times find my self doing with the B+W ND110. Now, the ND110 does alter the color tones, it makes the image warmer. It really is not a huge deal, but it can make a difference. And believe it or not, 10 stop is a big deal compared to 9 stops. I can push the 10 stops past 30 seconds, easily. If I make the aperture really small, I can get 40 or more seconds and still not be over exposed. But with the 9 stops, 30 seconds really is my max. Clouds out and covering the sun can extend that, a bit.

So, once again, why would I want to make 13 stops by stacking the two filters over just sticking with the 10 stops of the ND110? Because with 13 stops at my fingertips, I can really push it! In the sun, a 2 minute exposure is still VERY easy! And with a 2 minute day time exposure, a regular beach location can look like a place out of this world! For example, the image above is a 60 second exposure taken with the B+W ND110 and the Tiffen ND8. Middle of the day! The great thing about this 1 minute exposure is that the aperture is f/11. With any other filter or combo of filter, that would not be possible with out going to f/22 or smaller! And keeping it at f/11 is important to me, so the filters are perfect in play. I use to shoot these type of images at f/22 just to get the longer exposure, thanks to filters, never again! :) Ok, perhaps on occasion!

I hope you enjoy the image and I sure do hope you have a chance to check out my flicker account. I have a lot more photos there! :)

Monday, July 12, 2010

One Filter At A Time ~ hard grad, soft grad


Ok, so I spent time talking about my screw in Neutral Density (ND) filters, now it's time to talk about the square filters that are graduate filters. Grad as I call them. The grad filter simply means that the top is shaded, like the ND filters and the bottom is light. That makes it so that when you have a bright scene on top of the horizon like a sunset, the bright can be correctly exposure as the bottom. Basically, you still get details on the bottom and not over expose the sky.

There are two basic type of grad filters. A hard grad filter has a line in the middle, the top is dark and the bottom is light. And the other type is a soft grad where it goes from dark on the top and fades to light on the bottom. The hard grad is perfect for a wonderful ocean sunset! What makes it perfect is the line in the middle. Match that line up with the horizon and take your best shot! The soft grad is really more practical though. I say that because the hard grad is not good for mountain ranges or any horizon with details with highs and lows.

Other then that, there is not much to it! Now they are square, so they don't screw in like the other ND filters. The filters I have are made by Cokin and and they have a holder that screws on to your lens and you simply drop the filters into the holder. With the one I have, I can stack up to 3 filter. Which I use to do back in the day before I discovered B+W! :) I still use it for the sunsets though. Nothing can replace my grads.

One thing about Cokin, which I to this day have a love/hate relationship with, is the color! And sometimes I cannot correct the color cast in post. The Cokin filters adds a bit of a pink color cast and the more I stack the more the colors. And when the color gets on my nerve, I process in black and white! Takes away all of my color issues!

With the image above, the addition of a pink hue really works! I was able to correctly expose the sky and the ground and despite the brightness of the sky, I was able to get a long enough exposure to have movement in the water. Hey, it works! :) And the exposure on this, to be exact, is 10 seconds.

Thank you for stopping by! Enjoy my blog and feel free to leave comments or suggestions, for other blog topics? I sure hope you enjoy!

Sunday, July 11, 2010

My OH NO star trail!


I wanted to take a small break from the topic of filters, to talk about my OH NO! star trail last night! Tomorrow, I should continue with the filter topic, moving on to the Cokin filters.

What in the world do I mean by OH NO? I was SO happy when I went outside at 3 am this morning and saw that the camera was still standing and the glass was not fogged over. And after reviewing the data on my computer, I had gathered a total of 5 hours worth of star trails! HOW AWESOME IS THAT! And then, this afternoon, I went to my star stacking program and saw the OH NO! during the beginning of the process, I saw right away my first OH NO. The first 3 exposures went well, then I realized there were gaps! 4.5 minute gaps! The camera chose 3 exposures, only three out of 62, to do the in camera noise reduction (NR) processing. What is that? If the exposure is 4.5 minutes, 270 seconds, then the camera will take that same amount of time to process. So, the image was 270 seconds and the post processing, in camera, was 270 seconds making one image the time to take and process a total of 9 minutes! For one image! And that happened only in the beginning.

The second OH NO! moment of the night/morning. Right around exposure number 27, the camera shifted some how! Shifted by a large amount! More so then my earthquake picture. So, my flickr image is only the last 36 images and this one here is a total of 62 images, with the shifting and all. The good news is, the one good image I created to share on Flickr is still a whopping 9720 seconds long! THATS a lot of time! Each exposure is 4.5 minutes long for a total of 36 exposures. Now, the one you are looking at here, is the full version. From 10pm to 3am! The whole 5 hours. Exposure time total, 16,740 seconds. This time does not include the three gaps for the in camera NR and the one second gap between each exposure.

Not much more to say really. Except I plan on trying this again! And soon. This for me is all about trial and error, next shot I will use a lower ISO and that should take away the issue of the NR processing. And for less gaps in the exposure in all, I might try at 7 minute exposures. Now that I have a timer cable, I can program it to do what I want it to do! YA! :)

For the record, for those who might want to give this a "GO" the cable I use, Opteka, OP.C3 Timer remote cord. I got it on Amazon.com for about $50. Which is a great prices considering the Canon Exposure lock is $60 and the only thing it does is open the shutter and lock the exposure! :)

I encourage you to visit my Flickr site to view the smaller version, it looks more perfect, but this one, it has charter! :)

Thank you for stoping by and taking time time to view and read my blog.

Saturday, July 10, 2010

One Filter At A Time ~ B+W ND110


Ah, the B+W ND110! My powerful 10 stop filter. The filter that started it all! Now, it was not my first filter. I did get for Christmas last year a set of Cokin filters, and I did have fun playing around with them learning about blocking light and all, but that was a gift that was chosen for me where as the ND110 was the first filter where I went online myself, did the research, learned all about ND and found out about ALL the wonderful choices out there! Not a lot of companies, that I know of, make a 10 stop filter like this! Hoya makes a 9 stop and Lee makes the big stopper, which is 10 stops. But Lee is drop in square filters and B+W is the screw on type. Any way, the passion started here! I spent hours of time doing research and I KNEW that I was not going to settle for 6 stops, at this point any way! (I came across a 6 stop at a local photo store and I chose to hold out!)

So, what is so special about this filter? It looks almost as dark as the lens cap! I can shoot a 30 second exposure INTO THE SUN with this baby! YA, its that dark! When I started photography in October of 09, I knew I wanted to do a 365 project starting Jan 1, 2001. About a month before day light savings, I started to really stress, because the theme of my 365 is LONG exposures. The goal being 30 seconds or longer! How in the world was I going to do that during day light savings when it did not get DARK till almost 9pm? I have a family you know! Its just not reasonable to leave the house ever night to find something new to shoot! And sunsets? Forget it! There was no way I was going to make a lot of sunsets at the beach any more. SO, I made it a point to find a way! While surfing flickr one day, I saw a 30 second day time exposure and I just about freaked out! I sent out a flickr mail to the person right away to find out who, what, where, when and why! Because thats EXACTLY what I wanted to do!

With in 2 weeks of finding what I wanted, and ordering on Amazon, BEST price, I had the 10 stops in hand and I was OFF! Of course, I had tech issues with my wide lens, so for the first month and a half, I had to use the B+W ND110 on my zoom lens, I was just forever grateful I also got a step up ring when I ordered the filter! When I finally had my wide lens AND my B+W ND110, I was IN HEAVEN! Such a magic combo and I have been shooting with them ever sense. Now, after about a month of shooting with the 10 stop, I knew I wanted to expand and get some less dark filters to get more details in the water. When all is said and done, between these 3 filters I have now shared with you, I am able to get any where from an quarter of a second to 2 minutes, or more I guess, at just about any f stop I want to! And any time of day or night. Now that's power! One of the things I like most about this filter, is how many things you CAN do with it. For example, if you really push up the ISO, you can get a quarter of a second shot! But if you really play with the aperture and close it way up, a minute exposure is reasonable! Thats a pretty far reach! It just so happens that I prefer ISO 100 and f/11 (ish) so the other filters all have there place! So why 10 stops and 30 seconds? Because the water gets to be OH SO smooth! I mean, LOOK AT IT! :) Others like to call it "misty." Ya! And, another thing you get with this extreme of ND, the clouds move during that time! The moving clouds also adds an awesome detail to the image too.

Now, the picture above is from one of my favorite spots in La Jolla, California. Called Windansea. This was from the other day, and the day was very overcast. Translation, not as colorful as usual! Life goes on! But you get the point. Tomorrow, I will post a more colorful version of the same spot. But its a longer exposure with stacked filters, so that will be another topic! I keep thinking of new topics, YA! :)

Friday, July 9, 2010

One filter at a time ~ B+W ND106


Oh, the B+W ND106, 6 stops, my new most favorite filter! The reason why I jumped forward to get this filter was because the 10 stop was giving me TOO long of exposures and the 3 stop was not giving me enough length of exposures. I NEEDED something in the middle! Something that gave me a couple or a few seconds, not half a minute! I have learned in photography, that if you photograph the waves at the ocean for 4 to 6 seconds, they look like they are moving! But if you slap on the 10 stop, the water goes from waves to misty. Which is a great effect, but MAN, so is the moving waves! I love them both, but I NEED to be able to do both. Thus, the B+W ND106 holds a special place in my heart.

WHat else do I do with it? On my last post, I shared that the Tiffen ND8, 3 stop, is very stackable to add just a bit of extra ND. One of my favorite combos is the Tiffen ND8 with the B+W ND106 to make a total of 9 stops. Believe it or not, there is a difference between 9 and 10 stops. It really is amazing the gaps at this point of the scale. However, the hidden reason why I often prefer the 9 stops with stacking vs. the 10 stops of the ND110. The post processing! I can, under non bright conditions, get a 30 second exposure with the two lighter filters stacked, but they are great together and do not give off a warm hue like the B+W ND110! So, if I want an easer time working with the post processing, I would rather stack the two lighter filters then to use one dark one. Lazy? Not really, just know my limits by the end of the day! :)

The image above is a 4 second exposure, thanks to the B+W ND106. A perfect length of time to gather in the movement of the water over the rocks. The evening at this point was very overcast and I could have pushed the exposure even longer if I wanted to, but I knew that I wanted to keep the 4 to 5 second range for this and I was right! Turned out exactly the way I wanted it to! :)

Thursday, July 8, 2010

One filter at a time ~ Tiffen ND8


So, now that I have started the conversation about filters, I realized that I missed SO much information! Because each filter has there own task and talents. And each one has much different results because of it. So, why not! Lets create a blog for each filter, one at a time! I wanted to start off from lightest to darkest. Mainly because the darker the better, for me any way! So, lets save the best for last. :)

Ok, on my last blog, I said that the 3 stop filter had no use! And even though I said NO use, truth is, I always knew it had some use. I just never gave it enough credit in the past. The day after posting that last blog, I found a new use for the poor little 3 stop filter.

For starters, it has a use, in the field, and thats to simply take away the bright from a very bright day. And with that in mind, depending on how bright the day really is, the Tiffen ND8, 3 stop filter, can still be hand held. No tripod required, unless you close up the aperture. For me, I still always use a tripod, my goal with the Tiffen ND8 is not to take away bright! I use it for what I always do with my filters, to slow down water! Or to freeze a nice "splash" at my favorite beach locations. The entire idea around the Tiffen ND8 is to simply slow down the shutter speed, just a bit, to get a more desired of an effect. And, can add a deeper depth of field. The great thing about adding it to my collection, is that I can use it in more ways than any of my other filters. I can use it solo and create a quarter of a second exposure, of course on a very bright day, that quarter of a second turns out to be an eighth of a second real quick! But for the most part, I can really push it to a quarter. I can stack it on top of my 6 stop filter to make 9 stops. I can stack it on top of my 10 stop to make 13 stops! This one is great for creating day time two minute exposures at an f/11! Thats fun! :)

But the newest use, fireworks! I was reading someones post on Flickr, about shooting fireworks. This guy did a little fireworks 101 post at which I was grateful to come across before the 4th because this past 4th of July was my first try at shooting fireworks! The guy suggested using an ND filter, and the moment I read that, I thought TIFFEN! I shot the first 5 or so minutes without the filter, and they turned out OK, but once I put the filter on, I had so much more control! The brighter fireworks, the whites, were not over bright! YA! :) So, I kept the filter on for the rest of the evening. And another thing I loved about the fireworks, is when I went to do the processing on the images, they were all so sharp! So sharp, that I could do just about any crop. Any zoom, anything! I like that!

So, the above image, is of this years fireworks from our little town in California. With the Tiffen ND8 filter, I was able to get a full 22 seconds on this exposure with out over exposing any one area. I was really able to PUSH the night time exposure just a little bit more so that the light trail of the fireworks would be longer and better. Which, in my book, MONEY! :)

I hope you enjoy, and feel free to add any comments or suggestions. Most of all, I hope that my blog is of use to you and any one who reads this. I just might become an instructor instead of a photographer! And feel free to visit me on Flickr any time!

www.flickr.com/photos/cuteasabugonarug/

Sunday, July 4, 2010

The filters in my gear bag!


So, when I started this blog, I was thinking that I would use it to sell work! Ya, lofty goals! I really would like to eventually sell work, but I guess being out there a little longer will be a good thing for that goal. So, lately I have noticed that I have been leaning towards "teaching" some of my techniques. For example, my last post was about star trails and stacking them. And with that one single post, I got more followers then any other time! And I have to admit something, I think I am a better teacher then a photographer, but do not tell any one that! Often times, when I teach something, that someone goes out and shoots better then I! UGH! :)

So, today, I wanted to share with you a topic that I get asked about a lot. And that way, I can send others here instead of typing out the information over and over and over again!

Today I want to share with you my most favorite gear in my camera bag, my filters. I will share with you what filters I have and what the function is for each one of them. Now, one thing I have noticed about ND (neutral density) filters while going out and shopping for them, they are hard to find exactly what you want and when you find it, it might not be exactly what you want. For example, I purchased the Tiffen ND8 thinking it was an 8 stop filter. I was very disappointed when I received it and it was quite light. Ended up being a 3 stop filter.

Tiffen ND8 (3 stop filter). A useless filter for the most part for what I enjoy shooting. It really is meant to take the edge off of a bright day. I have found that with this filter, I can still, depending on light, hand hold the camera. What I use it for the most, is I stack it with other filters to add to the strength of already strong filters. The ability to stack gives me more stops when I need them the most.

B+W ND106 (6 stops). I love this filter. I started off with a very strong filter, and I got this one because the 10 stop is too dark to do a lot of things to maintain details. This filter is going to get you any where from a quarter of a second to 6 seconds. Depending on light and on your aperture. With this filter, you can freeze a wave in motion, giving it a great splash effect. With this filter you can make the water look like its actually moving! Even though you have pushed the length of time, to about 5 seconds. The versatility of this filter is amazing! And when stacked with the Tiffen ND8, creating 9 stops, you can push the exposure to 20 to 30 seconds, making the waves look more misty. (I say waves because 90% of the time, I am shooting the ocean)

B+W ND110 (10 stops). Probably my most prized ND filter in my bag. Why? Because its almost as dark as the lens cap! Its tough to work with. Its so dark, that unless you are shooting in the sun, you have to focus your camera, with out the filter on. Then lock the exposure by putting the focus on manual. Then put the filter on and shoot! This filter is great for 30 to 60 seconds depending on where the sun is and what aperture you use. On an over cast day, you really can push that so much longer. And, to really push a day time exposure to 120 seconds, I stack the Tiffen ND8 on there to make a total blockage of 13 stops of light! Some day, if I really need big time blocking, I will be brave enough to stack the 10 stop with the 6 stop, but that really is far more extreme then I chose to go! :)

And last but not least, my set of Cokin grad filters. Grad just means dark on top and light on bottom. The usefulness of these is to make it a more correct exposure when you have a bright sky and a less then bright foreground. I have two of them. A hard grad, which has a line in the middle, where the darkness stars in the middle. The soft grad, it starts off dark and slowly graduates to light on the bottom. No point of starting or stoping with the strength of the ND.

So, that in a nut shell is what I own and what the use of each one is. I love to push my exposure. Wether I want a quarter of a second exposure or a couple of minutes worth of exposures, I have it all covered here. The reason I went with the ND filters is because I LOVE long exposures and when day light savings hit, I knew it was the only way I was going to get TIME out of my shots during the day. At which is now the only time I am able to get to the beach for shooting! There is no way I can hang out till 9PM just for a beach long exposure! I have a family! :)

I hope this is helpful to you and I sure will let you all know when I get a new filter. As of right now, I am totally happy with the filters I have in my bag! :)

For this image, I used the B+W ND106 and YES, I got VERY wet from this one!

Monday, June 21, 2010

Why stack?


My main recourse for showing off my photos is Flickr. For the most part, it it the only place where I receive feedback and well, I receive praise for my work! WHO does not love that? But once in a while I get questions and once in a while, I missed the chance to answer that question! What is it that I am asked the most about? My star trails! The one question that was asked and I never got a chance to ask, because it was deleted or I just cannot find it, why do I stack my star trails and not take one long one?

The image above is 3.5 hours worth of exposures. Each and every exposure being 30 seconds long and then I stack them together to make one image. Now, imagine if I would have taken a single exposure even half that amount of time! Not only is it tough to post process to make it look like a night time image, but that would be if it was not totally washed out! :) SO, thats why. Why 30 seconds for the stacking time? Because my camera only goes to 30 seconds with out help and I am not willing to sit by my camera for 3+ hours to turn on and off the shutter every 2 to 5 minutes! However, I am working on getting some new gear for my bag that will do that for me! Stay tuned for the new timer remote! (Soon, I hope)

The next thing I hear all the time, "Such a long process, so much involved!" Yes, there are many steps involved! But each and every one is easy! And if you are stacking, you defiantly can play around with ISO, if your camera can handle it, go for ISO 500! Or higher. But ISO 400 is quite comfortable for just about any camera.

1) Go wide! Wide aperture and wide lens. F/3.5 or F/4 is great! But makes a difference, so the best way to know what works for you is to play around. Set your camera for a 30 second exposure then change the aperture for another 30 second exposure to see what you get! Time is what is needed to make it perfect for you! It took me months of doing star trails before I realized I love to keep it at f/3.5. And the wide lens, when you are doing star trails, the more wide, the less gaps between images. Gaps happen. But going wide will make a huge difference. My choice of lens is my Tamron 10-24mm. And I set to 10mm.

2) Set your camera to Continuous shooting mode which will keep your camera shooting when you walk away. That with the help of a shutter lock. Which is a cable that locks the exposure so that, once again, when you walk away, the camera keeps clicking.

3) Set your camera up to your composition, take a few test shots and make sure that your settings are going to work for how dark it is. A full moon will make a difference on the final outcome!

4) jPeg VS. RAW! Well, any one who is any one shoots RAW, right? Well, I am not saying I am any one, but I shot raw! Except for these star trails! Because when you take 300+ images, there is NO chance I am going into all the images to do the extra sharpening that is automatic with jPeg! Now, I have done both ways, but when you do RAW, you need to batch process the images, and make them jPeg to work the stacking software. Well, at least the only software I know! To convert from RAW to jPeg is a LONG but painless process! So shoot which ever way you want to! It will work.

5) Once you have all of your images that you want to stack together, you can stack them together using any of the many programs out there to do the trick. I hear that Photo Shop does stacking, so if you have it, use it! I heard its a little cumbersome, but I have no idea, I have never played with Photo Shop! The software I use is free and easy, however, only useable on PC. Because I am a MAC user, I have to dust off the PC for this. But I do so many star trails now, there is no more dust left!


There is the link for what I use. I sure do hope you take some time to try this your self!


Then, last but not least, a LOT of people tell me, "Oh, I want to try this!" GO FOR IT! Thats what I say. Get out of the city and shoot! Instead of shoot for the stars, go and shoot the stars!

The image above:
421 exposures, 30 seconds each
ISO 400
f/3.5
10mm

OH, and I forgot to say, this was on the evening where we got a 5.7 earthquake that was 54 miles from our home. The shift in the composition is from the quake, so there is not 2 north stars! :)

Sunday, May 23, 2010

A beautiful sunset!


So, it has been a little longer then normal sense I have done anything here on my blog. Partly due to pain. Been dealing with pain in both arms, which means less typing. Have I been on the computer any less? No, but I have been limiting my activity. So perhaps a little less. Any way, I thought sense I went out earlier this week and got some pretty cool image, I wanted to share one with any one who came across this and wanted to see it. I am still not sure any one is even reading my blog, and I hope people are. Perhaps I need to promote myself? :) I will have to think about that one. Any way, here is one sunset that I really enjoyed, and even though I came home with a broken DS light, took a swim at the hands of my 5 year old, I was still happy with the actual sunset. Please enjoy!

Sunday, May 16, 2010

Why do I care?


Oh, I have to say, I Like attention. I like it a lot! You might even call me a ham. I love attention wether it be at work, or online with flickr. Even facebook, bring it on! I have to admit, facebook has not seem much of me. And Flickr has, but much to my pain. Typing is not easy these days with my pain level, but I still love attention.

As of late, I have not been getting noticed much on Flickr. And I know why. When I show off my art work at my store or out and about with my iPad, I get noticed. But in the wonderful community of Flickr, my work is OK compared to the pros! And there is a good chance that my work is the same day after day after day! The point is, I need to do better. I need to get better. Otherwise I will get lost in the shuffle.

So, here is what I want to show, even though it is just more of the same, I cannot help but like it. This particular evening, my husband and I met up with a flickr friend and just enjoyed the beautiful sunset and evening. What I found is that his few images he posted on flickr were much better then mine! What? :) But thats ok, because I have a lot to learn still and he had been shooting for years. I will get better! And I will learn to step out of the box I am in!

Please enjoy!

Sunday, April 25, 2010

Why do a long exposure, when not necessary?


Often times, I am out there in the field taking LONG exposures when not really necessary, I mean, the mountains and the cattle gate, there is no clouds or moving water! Why bother?

Thats a great question, and has come up recently with my flickr post. Yesterday, I took an image of some mountains, that were just sitting still minding there own business. And there were no moving clouds in site, so the 51 second exposure was an over kill! Right? For that image, yes, it was an over kill. I keep telling my self that I am adding a larger depth, and for the most part, I really do believe that. The 51 seconds coupled with the post processing, yes, I do see a difference. But why do the 51 seconds when I can just put the camera on f/11 and get the same job done at 1/50 of a second? Practice! Practice makes perfect right?

A couple of weeks ago, I went down that same hill that I pictured yesterday, just to see a 100 foot waterfall. "The Devils Punch Bowl" in Ramona, California. And when I got there, I took with me my husbands 17-85mm lens because my wide lens was still in the shop. I though that my 28-135mm would not be wide enough. But, I did not have a step up ring for my B+W ND110. So, I not only had a lens I was not use to, but I had a filter that I could not put correctly on the lens. I ended up holding the filter over the lens, and only ONE image came out. All the others were destroyed because of light passing through where I did not do a good job holding the ND110 over the wrong size lens. Long story short, I was not prepared! That was a hellish walk and it was almost all for nothing! That one image made it worth the 4.2 mile hike which 100% of it was up or down. There was no level out areas! And for the record, I am NOT physically fit like the average person. Far from! I have spent the past 1.5 years NOT working out due to an unresolved work related injury! Now, I am always taking image with that filter at a much longer exposure needed because of that water fall day! Because, next time I put my self through that physical hell, I want to be SPOT ON with the photography. I want to come home with 20 great images to choose from! I will never become great until I practice, practice, practice!

And that, in a nut shell, is why I spend so much time taking an image, long exposure, of something that does not require time to be perfect! The image above, no clouds, no water, but I had a filter in hand. That was the day I received my B+W ND110. I had to run out and take a picture quick! That was the first thing I saw that I though would be a good subject, the cattle stall. I felt that the long exposure with the darkness of the filter really added such style to this image. And to convert to B&W just adding icing to the cake! Did it require 30 seconds? No! Did I learn a thing or two while out shooting for the first time with the ND110? YES!

Monday, April 19, 2010

Black and white


To start off with, I must say, it is a rare thing to see me pull out all the stops with a black and white image. However, not too long ago, a contact of mine, on Flickr, did a light house image and converted it to black and white to create a more dramatic look. I posted a comment on that image, "Oh man, its amazing, how did you get that image to POP?" His response was, "some talent, some PP." Oh, that darn post processing!

Here are the things that I DO know. I know the image was an instant pop for three reasons. The image was taken with a wide lens, and was at close range. The image was taken with a small aperture and a longer exposure. And, the image, during the conversion from color to black and white, had a great deal of depth added to it thanks to contrast. OH, and the clouds, so that makes 4 things that I do know. I waited a LONG time to get my wide lens back from the shop AND a day where I had time off and clouds in the sky. Finally the day came, and I picked up my 4 year old and we ran off to Cabrillo National Monument. The clouds were great! It was very windy and the American flag was wiping around. All in all, a great set up for me and my quest to emulate the image that was my inspiration. And, please, no worries, I am my own photographer, I am not out to COPY others! I was out to put my stamp on the same subject, thats all! :) My goal was to create the depth that my contact friend had accomplished. He spoke of talent along with post processing skills, I hope I have something in there. :)

Please enjoy my image of The Cabrillo National Monument, in San Diego, California. Please feel free to leave a comment and let me know that you are here checking out my work!

Monday, April 12, 2010

StarStuff!


And I do not mean Carl's StarStuff! I am talking about stacking! Lots and lots of star stacking. One of the things that I am really getting into, is stacking star images making star trails. Over the past week, I have had many attempts, most good, one bad. And that is how I learn. So, for these images, which are impressive in there own rite, with or with out me, I take MANY images in a row. Once all the images are taken, I open the folder in one program, hit the correct button, and bam! It's done! And is all I had to do was set the camera up. Oh, and I had to upload and download and load, load, load! :) Jumping though hoops are easy when they are not on fire! Its all so much easer then it looks. But sure does end up looking good! :) Please enjoy, the early days of my star trails.

This particular image is 149 images that are 30 seconds long.

Monday, April 5, 2010

The sun rises awfully fast!


I have been brave enough to wake up for sunrise twice over the past 4 months. Both were on a Sunday morning, before the family woke up, so I could get my beach time in. The goal was to not spend time away from the family and do this type of work while every one was still in bed. Works for me! Well, other then being tired for church! The image above is from the first time I made such an adventure. The alarm clock went off and I almost changed my mind! But did not, I got up and headed out to La Jolla. Beautiful La Jolla. I found the place I wanted to shoot rather quick, and I am grateful for that. Because by time I got there, dawn was approaching. What did I learn that morning? For the sunrise, I was not expecting how quickly the sun rises and make things bright! I did this exposure at 184 seconds long. During that time, conditions kept getting brighter and brighter. I finally though to my self, thats the exposure I wanted, so I closed the shutter. In the end, I though the image was totally destroyed! After careful post processing, I was able to save this image. Despite it being way over exposed. Upon posting this image on Flickr, I received high marks. A few even mentioned it was there favorite of my 365 project! Oh, thank you! :) Long story short, I ended up falling in love with the image my self. I hope you enjoy!

Wednesday, March 31, 2010

What I was looking for!


How many times, in the past, was I viewing other peoples photos on Flickr and wished I had a following too! How many times have I viewed a photo from someone else and wished that I can take such an amazing image! One night, from the pit of despair, I saw this image as I was walking up to the beach at Torrey Pines State Reserve. It had everything that all those OTHER photographers had in there amazing line up of photos. It had the ocean, duh, it had standing water, even a set of wispy clouds in the back. And the one thing I was missing, under the standing water was rocks and details! OH, all the good photographers have that in there set of photos to look at!

All I had to do to get there, was take my son to the bathroom, and well, I kind of had to go too. SO, we made it to the rest rooms only to find a sign that said something like "Budget cuts." and "bathroom closed!" What?!?!?! He is 4 years old! No bathroom? OK, so I take him to the restrooms that are at the OTHER end of the beach only to see the SUNSET on the way and to see the "budget cuts" sign on those doors! WHAT!!!!!!!! Ok, so I RUN back to the truck, hand my son over to may man, and RAN to the beach, where there was standing water and rocks under the water. Oh ya, did I mention, the tide was coming in? :) Ok, so by time I was able to fire off my first image, there was no standing water left, it was a once in a while rush, which stirred all the sand below. SO, in the image above, I was able to get some under water details, but really, very little compared to what I saw before the sun went down. OH and those wispy clouds? Over to the right and not the direction of my rocks and standing water. But the silhouette of the couple to the top left, I love! But at the end of the day, the set of photos I came home with that night, were some of the best I have had in a while. The lesson here? Learn to see what you want and compose the image instead of just shooting! And that was 2 months ago? And I am still learning that today! :) Foreground, foreground, foreground. That will be my goal for April. Look for the foreground element.

I thank you for stopping by and I hope you check out my flickr photo stream. There are a lot more photos there!

Monday, March 29, 2010

Moving on with Daytime Long Exposure


So, as I had posted before, I was getting into day time long exposure before I realized that the color cast of the Cokin filters was just getting annoying! And, I could only take the image to a few seconds with my stacked ND filters. Stacked was another word for lower quality, when I put the two filters together, it would add stuff to the image, like extra sun flairs and more spots that just did not come off during post processing. There had to be another way. So, that was when I started to look into EXTREME ND filters. Extreme as in, hitting the 30 second mark with one DARK filter. After much research, I knew that the B+W ND110 was the filter for me. At 10 full stops of light, the filter was suppose to be blocking 1000x's the light. When you take the filter and look into the sun, all you see is a round ball, I bet I can capture a solar eclipse with this baby! (I look forward to the chance to try!) Any way, on my first week of having the filter, I found myself quite successful at the idea of LONG exposures during the day. I give Cokin the credit for teaching me how to deal with the day time work, with out that period of learning time, the curve would have been grater! Now, the only thing missing, my wide lens. Before I got my ND100, my wide lens stopped working. Right now, it is still in the shop! It seams I can only have one pice of gear at a time! :) No worries, I expect it back next week, then you will start seeing WOW from me. I hope so any way. The image above is, from a distance, a 30 second exposure during the day. Please enjoy! And don't forget, check me out on Flickr. I put a lot more stuff there!

Sunday, March 28, 2010

Day time Long Exposure


Even before I received in the mail my B+W ND110 filter, I still wanted to work with and play around with long day time exposures. This image here is only one second long. But considering the sun was out, thats a long time! I do have a set of Cokin filters and in that set, I have two ND filters. ND filters is pretty much what I would consider sun glasses for your camera lens. You just slide it over your lens and adjust your settings, in camera, and shoot the subject. Before my new B+W filter, the Cokin were all I had and they did just fine! I think any way. They offer a pink hue to all the images and I had to correct in Post processing, but this image, the colors stuck around.

I am showing this to you because at last glance I mentioned to you that I was newly getting into day time long exposers, this was one of my first tries. Tomorrow, I will bring to you what the ND110 does, this was 1 second, I now can do 30+ seconds! I hope you enjoy!

Saturday, March 27, 2010

A very colorful evening


I have heard, that when a pro photographer goes out for an evening of shooting, they are not always happy with what they come home with. Some would even say that pros are happy to get one amazing shot out of 1,000. Of course, in there own opinion, they might be right, they are there own toughest critics. But I can see what they mean. I find my work, for the most part, good. I see that I have some natural raw talent that can get MUCH BETTER! I see that I can still learn more and that I know I have mad crazy potential skills! I see that someday I can become someone who can make a living selling art! In the time being, I want to get out and shoot, shoot and shoot some more. When I go out to catch the sunset, I have no idea if there will be a nice level of clouds, that will bring beautiful colors after the sun sets. If there are any clouds at all! For the most part, if there are any clouds at all, its SUPER overcast. So why do I keep waisting gas, going out for an hour drive, one way, just to shoot the sunset? Because of nights like this, where the sky is so alive with color. Far and few between, yes, but when I get there and see this, its one of the most amazing feelings in the whole world. And that one in a thousand shot? This was the ONLY sunset shot from that evening that I loved! I took a few before sunset shots that I liked, but from the lot of long exposure images, this was the only one I even considered good. Perhaps I have just become my own toughest critic!

I want to leave you with a link today, its a link to flickriver, where you can view my flickr photos in order of most interesting. Please take the time to view some of my work, and let me know what you think.


Friday, March 26, 2010


January 1st, 2010, a sunset I will never forget. My husband and I went out to catch the first sunset of the year. On top of that, it was our first chance to go out for the sunset after receiving for Christmas a set of Cokin filters. Something that had been on my wish list ever sense discovering my love for long exposures. I also thought, that with these filters, I would be able to get long exposures earlier in the evening. Yes, I was able to, but they were not "magic" and I did have to learn all about them and how they affected the shot and even at that point in my life, I still had a LOT to learn about aperture. As a matter of fact, that was the first night where I took on a 365 project. A project at which I was going to take a long exposure at least once a day and post that photo on Flickr, good or bad, I have a shot for every day so far. I had no idea that I would even make it this far, especially when the goal is for a 30 second exposure, or longer, every day! Some days have been less, but for the most part, 30 seconds! To make a long story short, Jan 1, I took on the project, March 26, I have learned SO much. And I still learn each and every day.

This image I have put here today, is from that most awesome sunset. I have not seen a sunset this great sense. I keep heading off to the beach, in hopes I do, I keep chasing the sun. Wondering what will turn out when I arrive. Sometimes I get color, but not like this. I hope you enjoy.

Oh, and what makes this one of my most favorite shots of all times? It was my first image on Flickr to reach 100+ views!

Thursday, March 25, 2010

An introduction to my photography


One of the things I love so much about photography, there are so many different styles and ways to present your work. After a while of shooting, I have realized that I have developed my own personal style. Where as my husband, Dan, has developed his own style too. After a couple of months on Flickr.com, I can almost tell who took the picture by the stile of the image. That being said, I want to share with you my own personal style of photography. There are two elements that I love the most, the beach and long exposures. La Jolla, in San Diego, being my most photographed beach. Why, because of all the rocks, the beautiful color of the water and all the natural beauty that comes along with it. I find that a beach with just sand and water makes quite boring photos! (Just my opinion) A sunset or sunrise setting is my favorite time of day to photograph, but I am learning more and more every day about taking long exposures during the day. More to come on that subject! For now, I hope you enjoy this image and feel free to view my work on flickr.com/photos/cuteasabugonarug/ and feel free to make any comments you like. I love feed back, good or constructive. I am a student of life and I still have a lot to learn.
Welcome to the wonderful world of blogging? Am I really in this world? Due to the fact I am new to this world, I will probably treat this more like a journal then anything else. I am not a writer but I enjoy sharing what is on my mind. I am also here to show you my passion and my hobby, photography. So for now, as I set this blog up with some photos to share, please be patient with me. The process might be long, but it will happen!